|
|
|
| ||
|---|---|---|
|
|
||||||||||||||||||||||||||||||||||||||||
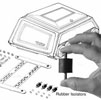
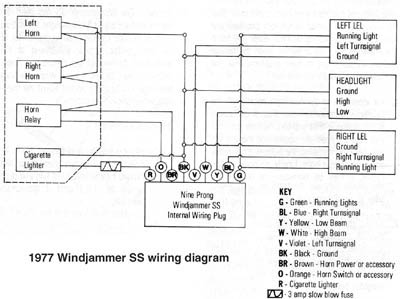
Installing a Used Vetter Windjammer Fairing & Electrical SchematicThe main models available in the used market are the Windjammer II, Windjammer III, Windjammer IV, WindJammer V and Windjammer SS. For photos of different Windjammer models and fairings for sale. The Windjammer II, III, IV, V and SS are all basically the same. They vary in details like the presence of built-in turn signals, headlight adjuster, etc. They are all the same "size", if you want to call it that. They did not make a different fairing for a Goldwing vs. an XS11. To confuse the issue a little, both Yamaha and Kawasaki had Windjammers built with their own brand name and some trim details, like a rectangular headlight for the XS11. Yamaha also sold re-labeled Pacifico fairings for a while. This is the same fairing Swanee is selling as the Pacifico "Classic" for $695. Some more trivia: Vetter also made the Vindicator fairing which was basically the same as the Windjammer III. It did not have the built in turn signals. You moved your turn signals to the fairing. They also made the Quicksilver fairing which looked like a scaled down WindJammer. It was supposed to be more "sporty". They also made a fairing called the Rooster which was more rounded. I don't think they made many of these because it wasn't too much later that they went out of business. The key thing about buying/installing a Windjammer Fairing is the mounting brackets. Vetter made different mounting brackets for each motorcycle model. The mounting bracket is a welded up affair that bolts to the frame of the motorcycle. The Windjammer bolts to the mount. The first Windjammer Steve Warren bought was a Windjammer III to use on his TX500 Yamaha. When he moved up to a XS750 he just bought a new mounting bracket and put the same Windjammer on the XS750. In 1981 he bought a brand new left over 1979 XS750. A little later he bought a new Windjammer IV along with mounts for the XS750. By then Vetter was out of business (or nearly so). When he bought his XS1100 in 1994 he attempted to put the Windjammer on the XS11. He bought a mounting kit from someone on the list but it was for the Pacifico fairing not the Windjammer. The problem was the Pacifico mount was a two piece affair. A main piece and a brace. The brace flat out wouldn't work on the Windjammer so he tried it with out the brace. It seemed to work okay so he took a "little" ride from Cincinnati to Seattle. What did it in was that he rode up a very bumpy dirt road looking for a place to camp. Without the brace the mount flexed too much and a couple days later it broke just outside of Glacier National Park on a Sunday. Believe it or not he found someone to weld it back together on a Sunday and continued on his way. It started to go again the next day so he bought a handful of hose clamps and lashed it to the frame with those. It held just fine after that. Steve Williams recently added a Vetter Windjammer SS fairing and lowers to his '79 Special. The fairing he bought used came from a Kawasaki, but the dealer had a mounting bracket for a Yamaha 850 that he threw in. The 850 is a triple and has different spacing of the frame down tubes, so it would not bolt up to his XS. Rather than spend time looking for the correct bracket for the XS, Steve modified (cut & weld) the 850 bracket to fit the 1100 frame. The fairing now fits perfectly. The lowers also fit well, but had to be trimmed slightly to clear the engine cases. Dave Hogue has a WindJammer SS mounted to his '78 XS1100E. After much fruitless searching for an XS1100 mounting bracket, he went with the closest thing he could find. The mounting bracket does not line up with the down tubes perfectly, but four metal hose clamps has held it very solidly since early 1998. The Vetter mounts bolt onto the frame of the motorcycle, usually on the two front down tubes. It will bolt or clamp, depending on the bike, just below the steering head. The Pacifico brace runs down and clamps to the frame down close to the exhaust headers. The brace is important, as Steve Warren found out. Just be careful that the mount doesn't flex too much. If the shop or individual selling the used Windjammer has any mounts it might help to look at it so all this makes sense. The bottom line is that any WindjammerII, III, IV, V or SS should fit your XS11 using the proper mounting bracket. Finally, if you do buy a Windjammer make sure you get the wiring harness with it. Or you can make your own, see Vetter Accessories and purchase the electrical harness repair kit and some color coded wire (9 pieces of wire 2 - 2.5 feet long). It runs from the headlight back to the left inside of the fairing. All of the wiring is done in the wiring bundle inside the headlight shell. Most of the wires come with the correct plug on the end. So, for example, you just unplug the stock turn signal wires and plug in the appropriate wire from the wiring harness in the Windjammer. The running light wire is different. It uses a 3M "bridge tap" connector. You slip the 3M connector over the bike's wire, slip in the green fairing wire and crimp it down. This taps the fairing wire into a always on power source. One little tip Steve Williams discovered while installing the stereo on the bike. DO NOT connect up the running lights into the circuit that feeds the headlights. It really screws up that reserve lighting unit. He tried it on his because he thought it might be nice if the running lights didn't drain the battery while starting. Sounds good but it doesn't work real good. Also, put a little contact grease in the scotchlock connectors to prevent the wires from corroding off. The original wiring information from Vetter for the Windjammer SS is listed below to help on what wire colors to plug together. Windjammer II, III, IV, V & SS Electrical Color CodesI've owned an SS & a Windjammer II fairing so the electrical code here is correct. If you have a Haynes or Clymer 1973-80 KZ900 Service Manual you can look up the wiring codes and compare with your model which wire is which for your bike.
NOTE: The orange and brown fairing wires are accessory wires. Only if they are to be used with the horn option should they be connected as stated above.
|
||||||||||||||||||||||||||||||||||||||||